How to stop Microsoft from spying on you.
Original article found at https://medium.com/geekculture/how-to-stop-windows-10-from-spying-on-you-b071134a11f6

How to Stop Windows 10 From Spying on You
You bought it, but you still paying for it…
Windows 10 collects more information about the user than any previous version of Windows, and it’s impossible to turn it off completely. After the initial release in 2015, Microsoft faced over two years of harsh criticism about what data it covertly collects from both the EU and private entities. After the initial backlash, they overhauled the privacy settings, introduced new tools, and disclosed some of the data they gathered in a blog post.
European Union data protection watchdogs warned that Microsoft didn’t go far enough to protect user data, while France has ordered Microsoft to stop tracking its Windows 10 users. Seeing how valuable user data has become, there exists an air of uncertainty around Windows 10 and how truthful Microsoft is.
There are several steps you can take to minimize tracking and data leakage in Windows 10. We’ll start with simple privacy settings and then move on to more advanced Group Policy and Registry Edit modifications.
Disable Ad Tracking
When browsing the web or using Windows 10 apps, Windows collects information about your activities, and much more so than the previous version of Windows. This information is used to create an advertising ID that is used by a variety of companies to target ads.
How to disable:
- Go to Settings and click on Privacy and then General.
- Disable all settings as shown in the picture.
- (optional) If you have an Online Microsoft account.
Visit https://choice.microsoft.com/en-us/opt-out and turn off the option that says Personalized ads wherever I use my Microsoft account.

Disable Location Tracking
Whenever on the move, Windows knows where you are since it tracks your physical location. Windows does this to be able to deliver relevant information to you like the local weather or nearby restaurants.
How to disable:
- Go to Settings and click on Privacy and then Location.
- Disable all settings as shown in the picture.
- Hit Clear under Location history to clear previous location data.
- (optional) Allow apps to access your location
Some applications need location to function; by enabling this function, you can customize what apps get location access further down under:
Choose what apps can access your precise location.

Disable Camera
Most notebooks have a built-in camera that windows enable by default; this can be incredibly dangerous since hackers use them to record and extort users with compromising videos. In most cases you can disable the camera altogether, and if you use for example Skype you can limit the camera to only that application.
How to disable
- Go to Settings and click on Privacy and then Camera.
- Disable all settings as shown in the picture.

Disable Microphone
Equally dangerous, the built-in microphone is enabled by default, making listening in on conversations reasonably easy for an experienced hacker. If you are using the microphone on Skype or a gaming headset then limit what apps are using it. If you’re not using it the microphone, it should be disabled.
- Go to Settings and click on Privacy and then Microphone.
- Disable all settings as shown in the picture.

Disable Timeline
Timeline is a feature that enables you to resume activities and open files on any of your Windows 10 devices. To do that Windows collects information about your activities on each machine and sends that data to Microsoft.
How to disable:
- Go to Settings and click on Privacy and then Activity History.
- Disable all settings as shown in the picture.
- Hit Clear under Clear activity history to clear previous activity history.
- (optional) If you have an online Microsoft account.
Click Manage my Microsoft account activity data and you’ll be sent to Microsoft’s Privacy Dashboard where you can clear your data on Microsoft.com

Disable Connection Sharing
This feature enables people in your contacts to access your WiFi without entering a password. It’s a convinient feature but it’s not a secure one, disabling it is preffered.
How to disable:
- Go to Settings and click on Network & Internet and then the WiFi tab.
- Scroll down to Releated settings and click on Change adapter options.

3. In the new windows that pops up, right-click on your WiFi adapter and choose properties on the bottom of the menu.

4. Click the Sharing tab in the new windows that pops up.
5. Disable Allow other network users to connect trough this computers Internet connection and hit ok.

Disable Update Sharing
By default Windows 10 shares updates downloaded on your PC with other users on your network and across the internet. It’s a Peer-to-Peer system called Windows Update Delivery Optimisation (WUDO) that decreases the load on Microsoft’s servers but increase demand on your computer an internet-connection. This slows down your computer and introduces potential security issues.
How to disable:
- Go to Settings and click on Update & Security and then Delivery Optimization.
- Disable all settings as shown in the picture.

Change Diagnostic & Feedback options
When using Windows 10, Microsoft collects data about your hardware and what you do when you use Windows. Microsoft officially says it does this to improve Windows and customize advice, but in reality, you don’t know how they use this data. While you cannot disable this completely, you can use the minimum setting.
How to change:
- Go to Settings and click on Privacy and then Diagnostic & Feedback.
- Disable all settings as shown in the picture.

Manage Background Apps
Windows keeps some apps running in the background at all times, while some are needed for functionality, most of them are just wasting resources and collecting data. While you can turn off Background Apps all together, chances are some functionality will be lost. Most Windows 10 apps that come with Windows are safe to turn off, though, but if you use the function it should remain activated.
How to change:
- Go to Settings and click on Privacy and then Background Apps.
- Disable the following Windows 10 apps:
3D Viever, Alarms & Clock, Calculator, Camera, Films & TV, Mail & Calendar, Maps, Messaging, Microsoft News, Micsrosoft Photos, Microsoft Solitare Collection, Microsoft Store, OneNote, Paint 3D, People, Snip & Sketch, Sticky Notes, Voice Recorder, Xbox Console Companion, Xbox Game Bar, Your Phone.

Disable Account Info
Details about your account like name, picture, and other info are shared with other apps on the computer. In most cases, it’s not necessary, so disabling the function altogether is advisable.
How to disable:
- Go to Settings and click on Privacy and then Account info.
- Disable all settings as shown in the picture.

Disable Telemetry (Advanced)
Previous settings in this guide should disable data collection (or what Microsoft calls “Telemetry”), but to be completely sure, we can use more advanced methods to disable it permanently. Depending on your version of Windows 10 there are two methods to do this, one for the Home edition and one for Enterprise, Education, IoT, and Server editions.
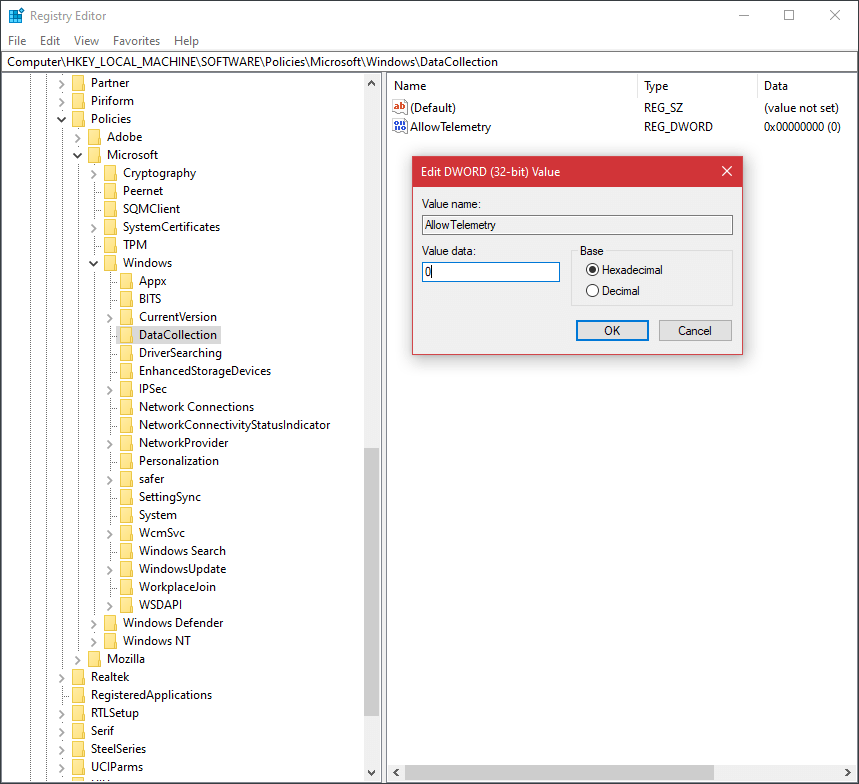
For Windows 10 Home edition — Registry Editor method:
- Press WIN + R keys to launch the RUN dialog box, type regedit in the dialog box, and press enter. The Registry Editor will now open.
- On the left pane, find the following key:
HKEY_LOCAL_MACHINE\SOFTWARE\Policies\Microsoft\Windows\ - Right-click on the Windows folder and select New and then Key and name it DataCollection
- In the right-side pane, right-click and create a new DWORD (32-bit) and name it AllowTelemetry
- Double-click on AllowTelemetry and set Value Data to 0
- Close Registry Editor and restart your computer before the changes take effect.
For Windows 10 Enterprise, Education, IoT and Service editions — Group Policy Editor:
- Press WIN + R keys to launch the RUN dialog box, type gpedit.msc in the dialog box, and press enter. The Registry Editor will now open.
- Go to:
Computer Configuration -> Administrative Templates -> Windows Components -> Data Collection and Preview Builds - In the right-side pane, double-click on Allow Telemetry and select Enabled option.
- Now select 0 — Security from the drop-down list under options.
- Close Group Policy Editor and restart your computer before the changes take effect.

Congratulations!
Your are no longer sharing your data with Microsoft.